In our first tutorial on using QuickTime Player for Mac, we focused on creating audio files. However, QuickTime player is more than a one-trick pony, so this time we’ll take a look at how to create video recordings with a camera, either internal or external. (QuickTime Player can also create screencasts from your computer or connected iOS device, but we’ll save that for our final installment.)
Create a Video Recording from Camera
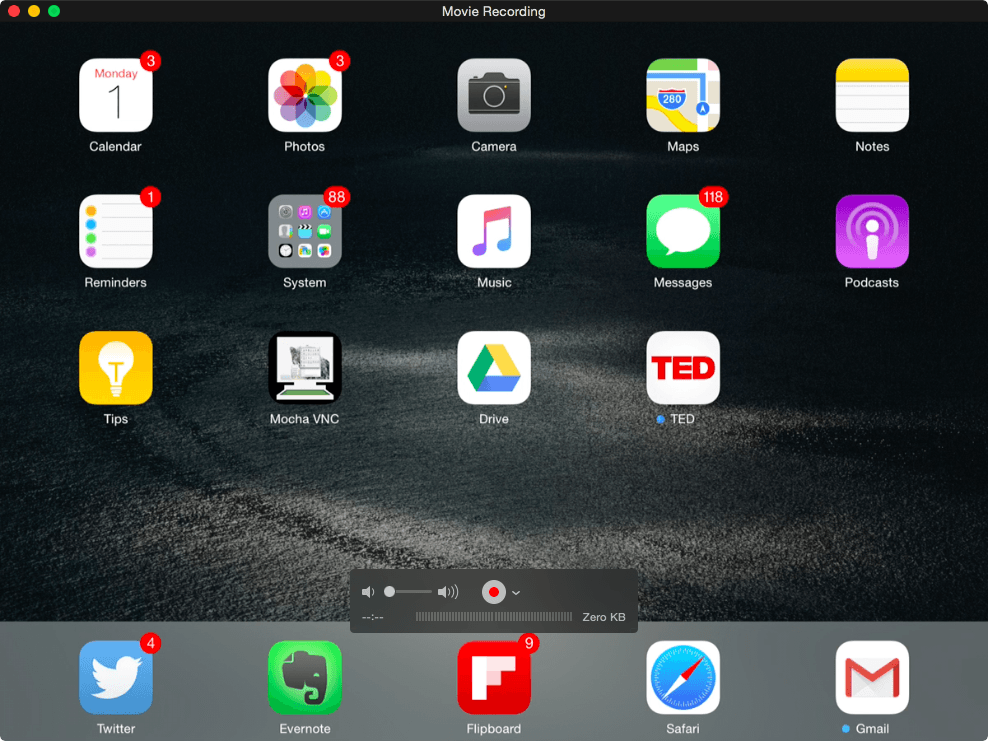
From the File menu, select New Movie Recording. The Movie Recording window appears, defaulted to the FaceTime camera (if available).
While the layout is slightly different, the elements of the recording/playback controls are similar to the audio recording features discussed in the first tutorial:
- Total recording time
- Volume input meter
- Total file size
- Record button
- Camera, Microphone and Quality selection menu
- Volume slider
The Camera, Microphone and Quality selection menu is opened by selecting the inverted caret next to the record button. The computer’s available cameras (video sources) and microphones (audio inputs) are displayed, as well as the option to select either High or Maximum quality.
The defaults for most MacBooks and iMacs will be something similar to ‘FaceTime HD Camera (Built-in)‘ and ‘Built-in Microphone: Internal Microphone‘. If you have other options available and wish to use them, simply select them from the list.
Additionally, if you have an iOS device attached to your computer, you will see it listed as an available camera. Don’t worry. We’ll get to this later in the tutorial. Promise.
Again, the Quality selection affects the size of your final file. The impact will be greater here than it was with an audio file, since we’re now talking about audio and video quality. Just remember that the higher the quality, the bigger the file.
Select the Record button to begin recording. The Record button changes to a Stop button and the total running time and file size increase as the video file is being created.
If the record/playback controls are covering your subject, or if you just want them in a different location, you can move the entire control box to a different area of the video window. Simply click and hold on any empty portion of the control box (the upper-right corner is usually easiest) and drag it to a new area of the window.
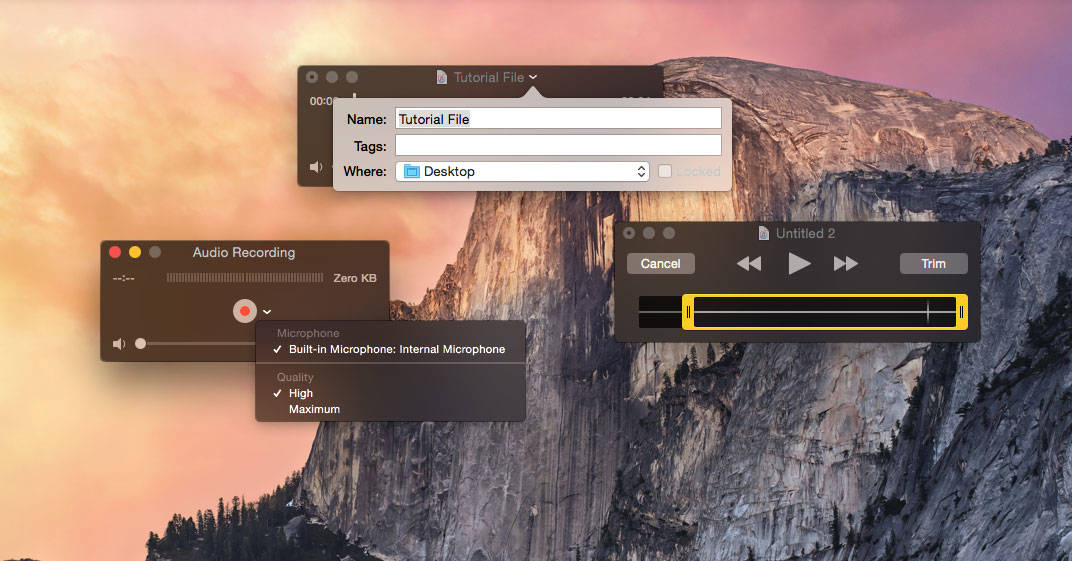
Select the Stop button when you’re done with your recording. The window’s ‘Movie Recording’ title changes to ‘Untitled‘, the volume input meter is replaced by a time slider, and the Record button and Camera/Microphone/Quality selection menu are replaced by the Rewind, Play and Fast Forward buttons.
Editing Your Video File
Now that you’ve recorded your video file, you may want to do some editing. While audio files only allowed us to trim space from the beginning and end of our recording, we have a whole new set of options for video files. Sure, you’re not going to have the full array of options you’d have with a high-octane program like Final Cut Pro, but the editing features available in Quicktime Player for Mac will help you quickly tidy up your video.
Trim
Just as you could with your audio file, you can quickly trim from either end of your video file by selecting Trim from the Edit menu. The video controls are replaced by a video timeline of your recording. A play button appears to the left of the timeline, with Trim and Cancel buttons to the right.
To trim the video file, select and hold a trim handle from the beginning or end of the video timeline. Drag the trim handle to the desired position on the timeline and release. Once you’re done trimming, select the Trim button to finalize the changes.
Split a Clip
You can break a single clip into two individual clips by placing the playhead at the point you want to create the division and selecting Split Clip from the Edit menu.
Splitting a clip allows you treat each clip of the video as its own entity. Any editing functions described in this section can be performed on one or more clips of a video file. You can select an individual clip by clicking on it in the timeline. The selected clip will appear with a yellow border. To select multiple clips, hold down the Command key while selecting clips from the timeline.
Rotate / Flip a Clip
You can flip your video vertically or horizontally, or rotate it by 90° at time using the Flip and Rotate options. For example, select a clip from the video timeline and select Rotate Left from the Edit menu.
Delete a Clip
If you want to delete a clip within your video file, just click on it to highlight it and select Delete from the Edit menu. Alternately, you can simply select delete on your keyboard when the clip is highlighted to remove the clip.
Move a Clip
If you want to rearrange clips on the timeline, you have a couple of options. First, simply click and hold the clip you want to move, and then drag it to the new location. The clips will rearrange in the timeline as the clip is moved.
You can also move clips by cutting and pasting. Select the clip you want to move on the timeline, and then select Cut from the Edit menu (or user the keyboard shortcut Command+X). The selected clip disappears from the timeline as it is moved to the system’s clipboard. Position the timeline’s playhead at the location you want to move the clip, and select Paste from the Edit menu (Command+V). The clip will be added to the nearest end (left or right) of the current clip.
Insert a Clip
You can actually use the cut (or copy) and paste method between open movies within QuickTime Player for Mac, too. This is a great way to build a movie from different recorded scenes.
Another way to add other clips into your current movie is by using the Insert Clip option. Select a clip from the movie timeline, and then select Insert Clip After Selection from the Edit menu. A file browser window will appear. Select the movie you want to insert into your current movie, and select the Choose Media button. The selected movie will be added to the current timeline.
But Wait…There’s STILL More!
That’s a whole lot of firepower for such an unassuming application. But we’re not done yet, folks! In the final installment of our tutorial on How to Use QuickTime Player for Mac, we’ll take a look at how to record the screen of your Mac or connected iOS device (aka screencasting). We’ll also leave you with some final tips, tricks and thoughts about your new favorite program. See you soon!

